
Recurring problem, on linux Mint / Ubuntu, the microphone of my different bluetooth headset are not working.
I have several bluetooth HeadSets and still have the same problem; the microphone does not work on my laptop.
I have no problem with the connection or the sound, but the microphone is not recognized.
HeadSets are not the cause because when connected to a smartphone, the microphone works correctly.
After several searches, I finally found a solution to make the microphones of my bluetooth HeadSets work in Linux.
In this article, I will share the manipulation I followed in order to take advantage of my different Bluetooth HeadSets under Linux Mint 20 / Ubuntu 20 (but it should work for other distro).
HeadSet Bluetooth: the different audio profiles
When connecting the HeadSet, we normally have the choice of the audio profile we want to use, there are 3 profiles:
A2DP (Advanced Audio Distribution Profile)
This profile gives the best audio quality but does not allow the use of the microphone
HSP (HeadSet Profile)
Audio quality worthy of a telephone call, but the microphone works 
HFP (Hands-Free Profile)
In line with HSP (the microphone works) but with some additional features for call management.
In Blueman, we don't really have a choice between HSP / HFP (they are grouped under same entry):
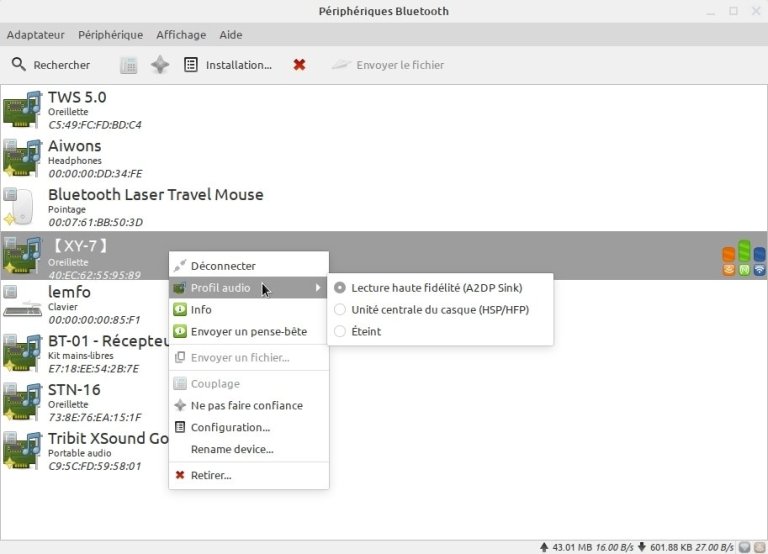
The problem with my HeadSets is that when connecting the A2DP profile is selected but it is not possible to switch to HSP / HFP.
When I wanted to switch, I received the error message: "Failed to change profile to headset_head_unit"
Installation of the packages necessary for the operation of your bluetooth headset
The article suggests installing 3 packages in order to operate the microphone of the Bluetooth headSets:
-
- ofono
- ofono-phonesim
- ofono-phonesim-autostart
For the first, ofono, no particular difficulty, just install it via apt-install
$ sudo apt install ofono
For the other two it gets a bit trickier because there is no package for Ubuntu 20.04 (yet), so I can't install it with apt-get install.
I downloaded the Ubuntu 18.4 packages by following the following links
ofono-phonesim
ofono-phonesim-autostart
But I was not yet done, I was hoping that the installation of the packages with dpkg would go smoothly.
$ sudo dpkg -i ofono-phonesim_1.20-1ubuntu7_amd64.deb
$ sudo dpkg -i ofono-phonesim-autostart_1.20-1ubuntu7_all.deb
This was without counting on the prerequisites, ofono-phonesim requires the installation of the libqt4 libraries and unfortunately these have been removed from the Ubuntu 20.04 repos.
Add libqt4 ppa
In order to be able to proceed with the installation, I added this ppa:
$ sudo add-apt-repository ppa: rock-core / qt4
After update sources with apt update:
$ sudo apt update
The installation of the package and it's dependencies is done without problem
Configuration
Pulse
In the /etc/pulse/default.pa file find and replace the line load-module module-bluetooth-discover by load-module module-bluetooth-discover headset = ofono
User
This is probably already the case, but the user pulse must be added to the bluetooth group:
$ sudo usermod -aG bluetooth pulse
Permission
Add these lines at the end of the /etc/dbus-1/system.d/ofono.conf (before </busconfig> ) file
<policy user="pulse">
<allow send_destination="org.ofono"/>
</policy>
Configure phonesim
Add the following lines to the /etc/ofono/phonesim.conf file
[phonesim]
Driver = phonesim
Address = 127.0.0.1
Port = 12345
Restart
All what's left to do is … restart ofono
$ sudo systemctl restart ofono.service
and start phonesim
$ ofono-phonesim -p 12345 /usr/share/phonesim/default.xml
Note that this command does not give you the hand back (you can use screen to avoid the need to open another terminal)…
As you might expect, installing the ofono-phonesim-autostart package saves you the trouble of having to do it manually after reboot.
Testing phonesim
In another window, you can test the startup of phonesim, to do so you must clone the repository and use the scripts provided:
For example, cloning in / tmp (you can clone it wherever you want)
$ cd /tmp
$ git clone git://git.kernel.org/pub/scm/network/ofono/ofono.git
Once cloned, go to the ofono / test directory:
$ cd /tmp/ofono/test
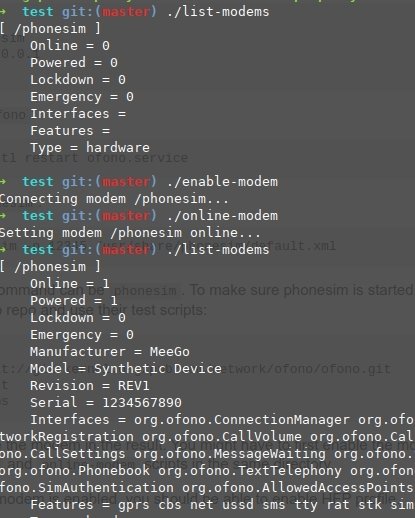
The first test that you can run is the one that lists the modems (./list-modems), you must find the one you have just configured:

If not, you must activate it with:
$ ./enable-modem & ./online-modem
And finally, you should be able to activate the HSP / HFP profile in blueman:

Test your bluetooth headset
And finally you can enjoy your hard work, once the bluetooth connection is established, you can test your microphone with your favorite instant messengers.
Small shell script created to activate:
#!/bin/bash
sudo systemctl restart ofono.service
screen -d -m ofono-phonesim -p 12345 /usr/share/phonesim/default.xml &
cd /home/cimalink/ofono/test &&
./enable-modem & ./online-modem &&
exit 0