
I have tested:
- MultiSystem ( http://liveusb.info/dotclear )
- MultiBoot USB (doesn’t exist anymore)
- Easy2Boot ( https://www.easy2boot.com/ )
- VenToy ( https://www.ventoy.net/en/index.html )
For me the best and easiest solution is ventoy.
What is ventoy
Ventoy is an open source tool to create bootable USB drive for ISO/WIM/IMG/VHD(x)/EFI files.
With ventoy, you don’t need to format the disk over and over, you just need to copy the ISO/WIM/IMG/VHD(x)/EFI files to the USB drive and boot them directly.
You can copy many files at a time and ventoy will give you a boot menu to select them (screenshot).
x86 Legacy BIOS, IA32 UEFI, x86_64 UEFI, ARM64 UEFI and MIPS64EL UEFI are supported in the same way.
Most type of OS supported (Windows/WinPE/Linux/Unix/VMware/Xen…)
620+ ISO files are tested (list), 90%+ distros in distrowatch.com supported (details),
Features
- 100% open source (license)
- Very simple to use (Get started)
- Fast (limited only by the speed of copying iso file)
- Can be installed in USB/Local Disk/SSD/NVMe/SD Card
- Directly boot from ISO/WIM/IMG/VHD(x)/EFI files, no extraction needed
- No need to be continuous in disk for ISO/WIM/IMG/VHD(x)/EFI files
- Both MBR and GPT partition style are supported
- x86 Legacy BIOS, IA32 UEFI, x86_64 UEFI, ARM64 UEFI, MIPS64EL UEFI supported
- IA32/x86_64 UEFI Secure Boot supported Notes
- Persistence supported Notes
- Windows auto installation supported Notes
- RHEL7/8/CentOS7/8/SUSE/Ubuntu Server … auto installation supported Notes
- FAT32/exFAT/NTFS/UDF/XFS/Ext2(3)(4) supported for main partition
- ISO files larger than 4GB supported
- Native boot menu style for Legacy & UEFI
- Most type of OS supported, 620+ iso files tested
- Linux vDisk(vhd/vdi/raw…) boot solution Notes
- Not only boot but also complete installation process
- Menu dynamically switchable between ListView and TreeView mode Notes
- “Ventoy Compatible” concept
- Plugin Framework
- Injection files to runtime enviroment
- Boot configuration file dynamically replacement
- Highly customizable theme and menu style
- USB drive write-protected support
- USB normal use unaffected
- Data nondestructive during version upgrade
- No need to update Ventoy when a new distro is released
Download Ventoy here
Start to use Ventoy
- Install Ventoy To USB Drive
- For Windows
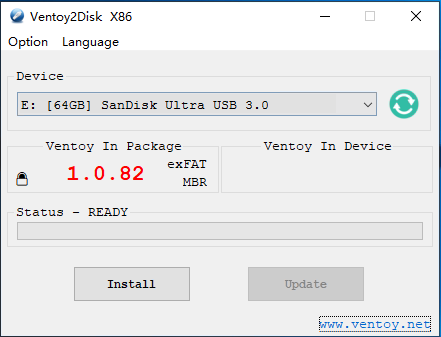
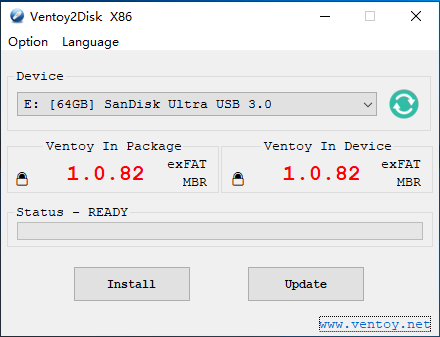
Download the installation package, like ventoy-x.x.xx-windows.zip and decompress it.
Run Ventoy2Disk.exe , select the device and click Install or Update button.
Notes:
- if Ventoy2Disk.exe always fail, you can use Ventoy LiveCD, refer notes
- Ventoy can be installed on USB drive or local disk. To prevent misoperation, Ventoy2Disk.exe only lists USB drives by default.
You can toggle theShow all devicesoption then all the disks will be listed. But at this time, you must be very careful and don’t choose the wrong disk. - MBR/GPT partition style option is used only during install and will be ignored during update.
- After install, the 1st partition will be formated in exFAT, and you can manually reformat it with FAT32/NTFS/UDF/XFS/Ext2/3/4
Linux GUI
- 1. Background
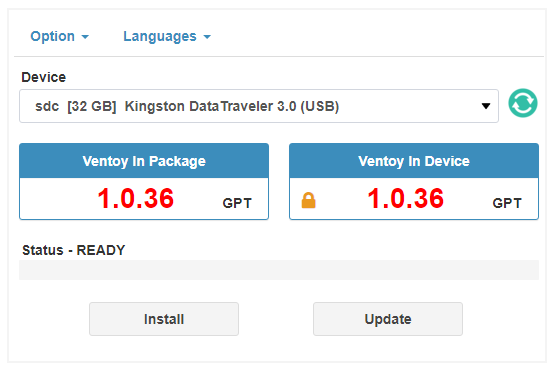
For convenience, Ventoy has provided a web browser-based GUI in Linux system since 1.0.36.
The UI layout and usage have no difference with Ventoy2Disk.exe in Windows.
Notes: If you run into problem in the GUI, you can use Ventoy2Disk.sh to install or update Ventoy. Refer usage
- 2. Screenshot
- 3. Usage for Deepin/UOS
- 3.1 How to use
Just run sudo sh VentoyWebDeepin.sh in the terminal.
- 3.2 How to close
Close the pop-up window or press Ctrl + c in the terminal.
- 4. Usage for Other Linux
- 4.1 How to use
1. run sudo sh VentoyWeb.sh in the terminal
2. open browser and visit http://127.0.0.1:24680
Tip: Step 1 will print the http address in the terminal. In many distros you can just press Ctrl and click the link with your mouse meanwhile.
- 4.2 How to close
1、Close the web browser
2、In the terminal, press Ctrl + c to exit
- For Linux – CLI mode
Download the installation package, like ventoy-x.x.xx-linux.tar.gz and decompress it.
Run the shell script as root sh Ventoy2Disk.sh { -i | -I | -u } /dev/XXX XXX is the USB device, for example /dev/sdb.
Ventoy2Disk.sh CMD [ OPTION ] /dev/sdX
  CMD:
    -i   install ventoy to sdX (fail if disk already installed with ventoy)
    -I   force install ventoy to sdX (no matter installed or not)
    -u   update ventoy in sdX
    -l   list Ventoy information in sdX

  OPTION: (optional)
   -r SIZE_MB  preserve some space at the bottom of the disk (only for install)
   -s          enable secure boot support (default is disabled)
   -g          use GPT partition style, default is MBR style (only for install)
   -L          Label of the 1st exfat partition (default is ventoy)
Attention that the USB drive will be formatted and all the data will be lost after install.
You just need to install Ventoy once, after that all the things needed is to copy the iso files to the USB.
You can also use it as a plain USB drive to store files and this will not affact Ventoy’s function.
- Copy Image files
After the installation is complete, the USB drive will be divided into 2 partitions. The 1st partition was formated with exFAT filesystem (You can also reformat it manually with NTFS/FAT32/UDF/XFS/Ext2/3/4 … See Notes). You just need to copy iso files to this partition. You can place the iso/wim/img/vhd(x) files any where. Ventoy will search all the directories and subdirectories recursively to find all the image files and list them in the boot menu alphabetically. Also you use plugin configuration to tell Ventoy only to search for image files in a fixed directory (and its subdirectories).
- Update Ventoy
If a new version of Ventoy is released, you can update it to the USB drive.
It should be noted that the upgrade operation is safe, all the files in the first partition will be unchanged.
Upgrade operation is in the same way with installation. Ventoy2Disk.exe and Ventoy2Disk.sh will prompt you for update if the USB drive already installed with Ventoy.